Feeds:
Posts
Comments

Archive for the ‘Bread’ Category

Pantry Pizza Pie

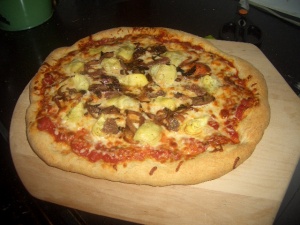
Making pizza from scratch may seem intimidating, but its really very easy, and a lot of fun too. You just need to plan ahead a bit so you have enough time for the dough to rise. It also helps to have a pizza peel and a baking stone. The peel will allow you to make your dough nice and thin, while still being able to slide it into the oven. As far as toppings go, the sky is the limit. I LOVE artichokes, so I went with canned artichokes, grilled onions, anchovies, mozzarella cheese and tomato sauce.

Pizza Sauce:

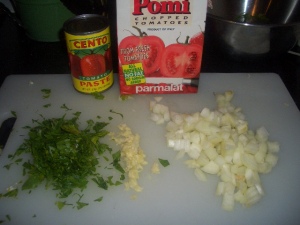
  • 32 ounces of canned chopped tomatoes
  • 1 can of tomato paste (make sure it doesn’t have any high fructose corn syrup!)
  • Water
  • 1 small white onion, minced
  • 2 cloves of garlic, minced
  • 1 handful of parsley, chopped (you can also use oregano or thyme)
  • Salt & pepper
  • 1 Tbsp olive oil

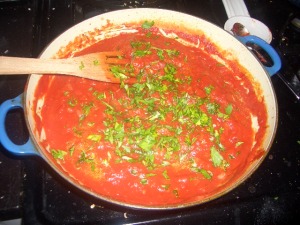
Saute the onion in the olive oil on medium high until the onion is translucent, about 3-4 minutes. Add the garlic and saute for a couple of minutes, then add the tomatoes, tomato paste, a small can’s worth of water, and salt and pepper. Simmer for 15-20 minutes, and add the fresh herbs. That’s it. (Sauce courtesy of the Honkers)

Pizza Dough:

  • 2 Cups Bread Flour
  • 1 Cup Whole-Wheat Flour
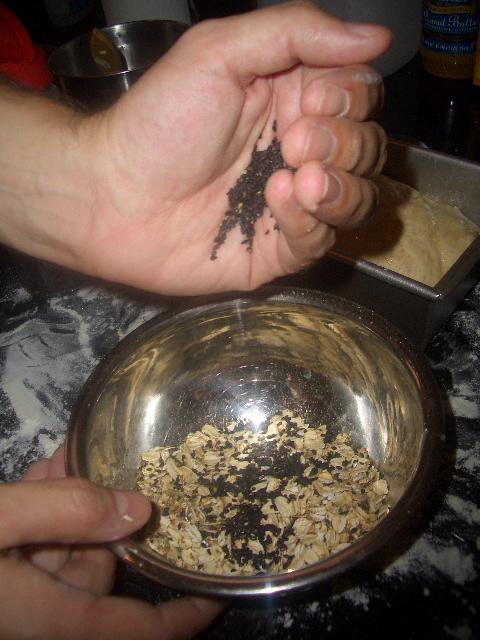
  • 2 tsp Kosher Salt
  • 2 tsp active yeast
  • 2 Tbsp Extra Virgin Olive Oil

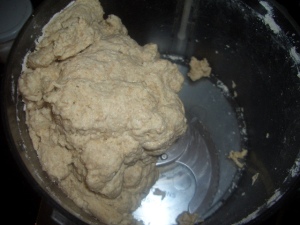
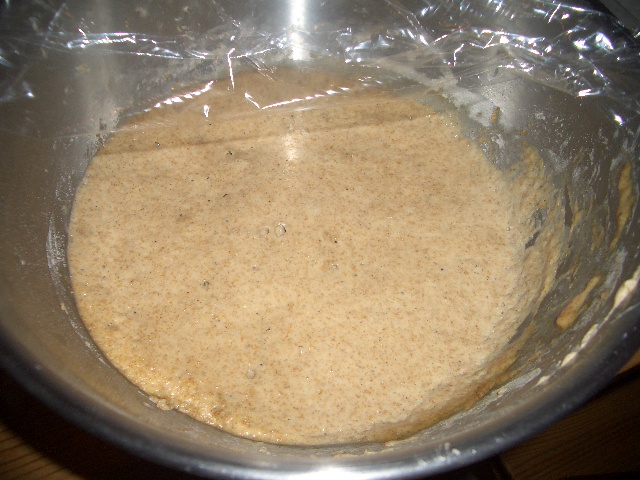
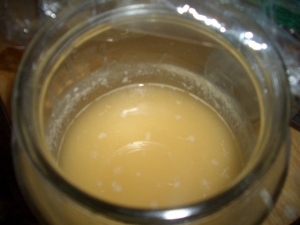
Mix the dry ingredients (I used the food processor with the normal blade attachment), then, with the food processor running, add the olive oil and about 1.5 Cups of water through the drizzle hole. Add just enough water so the dough forms a ball, and it is still sticky to the touch.

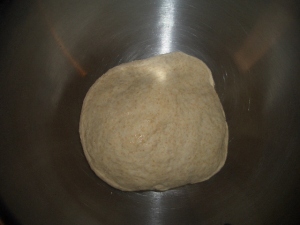
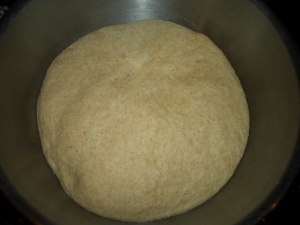
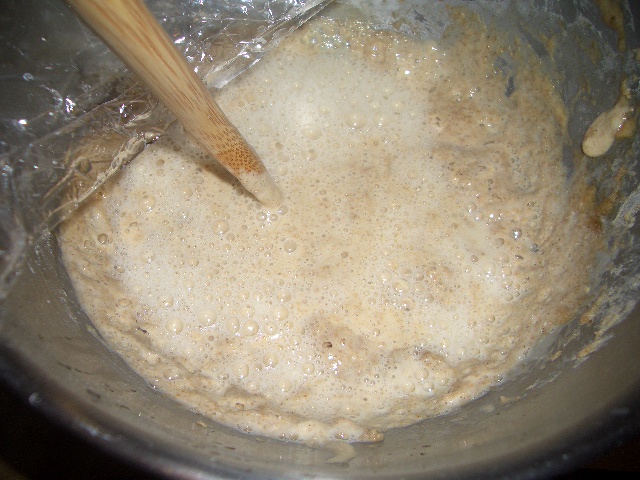
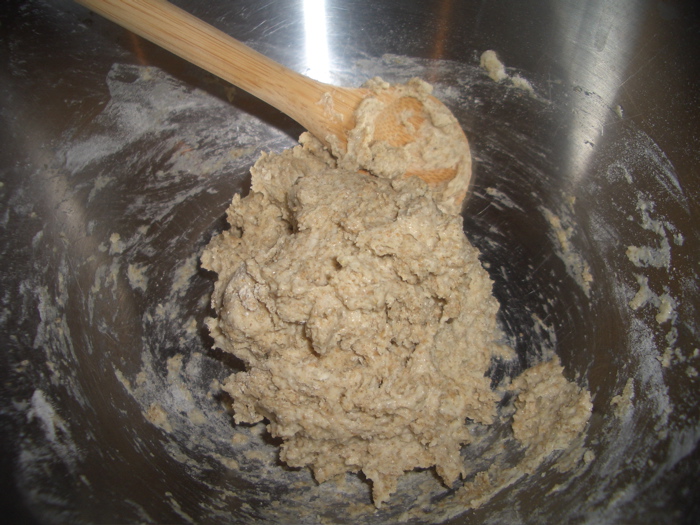
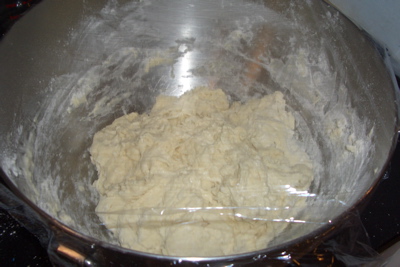
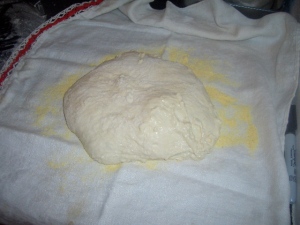
Next, work the dough for a few seconds on a floured surface, kneading, until it is smooth. Form it into a ball and place it in an oiled bowl, covered with plastic wrap, and let it rise for 2-3 hours. It should double in size.

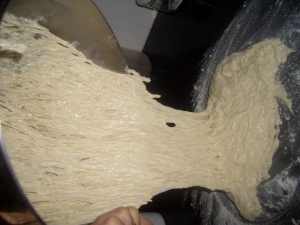
Next, turn the dough out onto a floured surface and knead it for 20-30 seconds. Split the dough into 2 with a dough scraper, and let it rest for about 20 minutes on the counter covered with plastic wrap.

I actually wrapped one of the balls in plastic wrap and put it in a ziplock freezer bag, labeled it, and put it in the freezer for another pizza day within the next month.

Now is a good time to preheat the oven to 500 degrees.

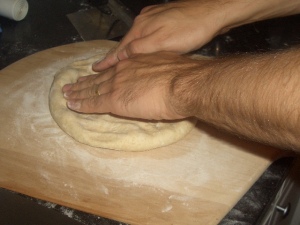
After 20 minutes, I dusted the pizza peel with cornmeal, and then flattened the dough on the pizza peel, and started rolling it out until it was very thin. You can pull it with the back of your fists like you see the pros do, but you can also use a rolling pin. If it gets too thin and tears, just patch the tear with a piece of dough from a thicker spot, no biggie.

Once the dough was about the size of the pizza peel, I thickened up the crust a bit by pinching, and added the sauce (see recipe above) about 2 ladels worth, just a thin covering.

Followed by the toppings:

First the pre-shredded mozzarella cheese, until the entire pie was generously covered:

Next the artichokes, anchovies (omit to keep it veg), and the grilled onions:

When adding the toppings, picture each slice, and make sure you spread the toppings around so each slice will get a nice mix.

Slide it into the oven:

18 Minutes later:

Read Full Post »

Bread is the perfect thing to make when you’re going to be around the house for the day. Today was one of those days, stormy and humid outside, trying to stay cool inside, in just a few hours, and with minimal effort, I had a fresh loaf of bread.

Special Honey Whole-Wheat Loaf

  • 12 ounces bread flour (I always use King Arthur’s)
  • 4 ounces whole-wheat flour (you can substitute any whole grain flour, such as spelt or rye)
  • 1 tsp kosher salt
  • 1 tsp active yeast (no starter needed!)
  • 2 Tbsp honey
  • 1.5 Cups Water
  • seeds and oats for the crust (I used flaxseed meal, oats, and black sesame seeds)
  • 1 scrambled egg (optional)

Mix all the dry ingredients (except for the seeds and oats) in a large mixing bowl, and stir in the water and honey until all the flour is incorporated, use a wooden spoon, or your hands.

Cover it loosely with plastic wrap and let it rise for about 1.5 hours, it’ll double in size.

Turn the dough out onto a floured surface and shape it

The easiest thing to do, is place the loaf pan in front of the dough, and flatten the dough slightly until its a rectangle with it’s width equal to the width of the loaf pan. Then roll it up into a log and place it into the loaf pan, seam side down. I sprayed the pan with canola oil.


If you want to use the egg wash, brush it over the top of the dough. It will help the seeds stick to the bread, but this is optional, and the seeds will be ok without it.

Sprinkle the seed mixture over the dough and gently press it in. Sprinkle liberally.

Cover it again with plastic wrap, and let it rise another hour.

1/2 hour before its done rising, preheat the oven to 450F

Slash the top of the bread using a lame, a sharp razor, or a very sharp knife, in one swift motion.

Bake 30-35 minutes, turn it out and let it cool on a rack. You can check the inner temperature, it should be around 220F.

Nice dark crispy crust, soft chewy interior, a real winner!

Read Full Post »

A great satisfying lunch or lite dinner:

  • 1/4 to 1/2 ripe avocado
  • Tempeh bacon (our favorite tempeh product)
  • 2 T Hummus
  • Tomato, maybe lettuce, or even sliced cucumber
  • On toasted sourdough
  • salt and freshly ground pepper.

One trick I learned from making bagels on Long Island on Sundays, is that when you make a sandwich, perhaps the most important step, is to cut the sandwich in half (I prefer on the diagonal, but that’s a personal thing), while gently pressing the sandwich components together. If the sandwich is well balanced, all of the ingredients will meld together. Sometimes I make this in the morning and bring it to work for lunch, but eating it right away is preferred.

Watermelon is a great dessert!

Read Full Post »

Day 6:

After a slight mishap on Day 3, (in which “I poured the water from a gallon pitcher into a tiny tablespoon right over the bowl and too much poured out and got into the dough“), my 3rd attempt at making a sourdough starter using the yeast lying dormant in our apartment has failed.

The promise of that quintessential sourdough (see above) however, will drive me to try once more to recruit the rising power of the wild yeast living in our kitchen.  But only after a proper analysis of what went wrong.

First off, how did I know it was wrong?

  • The dough should rise as much as 50% each day with proper feeding
  • If you slice the dough with a paring knife, you should see a lattice network of air pockets within nicely developed gluten.

After that fretful 3rd day, my dough did not grow at all. It remained quite smooth and flat, and when I ran a paring knife through it, all I saw was just how smooth, dense, and goopy it was.

And so, into the garbage it went

But what exactly went wrong? Why does this keep happening?

The more obvious explanation is that I added too much water, and as dough and baking in general are usually quite precise, the extra water spoiled the environment and the yeast died.

Another reason why it may have failed may be that it is July.  A hot and humid July. Our kitchen has been very warm, definitely warmer than the 75 degrees the book recommends. This probably accelerates the growth of yeast, and would explain why things were looking so good on days 2 and 3. If the yeast grew too quickly, the alcohol, or hooch, that is the byproduct of their starch metabolism, could have created an inhospitable environment that killed off the yeast. Sort of like dying in your own excrement. Not a good way to go.

But this is just a theory.

During my next effort, I will do 2 things:

  1. I will measure much more carefully, and never over the mixing bowl
  2. If the kitchen continues to be this warm, I will watch the dough more carefully and feed it more often if it seems as though the alcohols are building too quickly

Do any of you have ideas as to what went wrong? or suggestions for my next attempt?

Read Full Post »

Stiff Dough Levain: Day 3

My little ball of flour and water seems to have ripened nicely. I’m picking up very tangy notes of fruitiness that weren’t there on day 1. Both yesterday and today there was some rising, probably a 50% increase, and I have seen, smelled, and tasted many of the signs that the book says are indicative of a healthy culture.

Day 3, prior to feeding

So Yesterday I fed it 2 tablespoons of water, 50 grams (1/3 cup) of bread flour, and 2 teaspoons of organic whole-wheat flour. I mixed in the water, then added the flour and incorporated it all in.

After adding the water it froths up a bit

Today I fed it the same thing. Only I made one of the cardinal errors in baking, and I hope I didn’t blow it:

You are NEVER supposed to pour something over a bowl, and what did I do? I poured the water from a gallon pitcher into a tiny tablespoon right over the bowl and too much poured out and got into the dough. I think it was just a little bit extra, and I think I compensated by adding less than the required 2 measured tablespoons, but the book says the dough won’t be smooth. Check it:

That's Smooth

We’ll see…

Read Full Post »

After a couple of failed attempts at creating my own sourdough starter from scratch, I’m at it again. I’ve dusted the flour off of my shoulder and I’m going for it, only this time I’m attempting the classic:

Stiff Dough Levain (Classic Sourdough Starter)

Again, this could take anywhere from 4-10 days, and aside from daily feeding and inspection, requires very little work (or so I’m told).

  • 50 grams organic rye flour
  • 50 grams unbleached bread flour
  • 1/3 cup tepid spring water

Day 1

Method: Add the water to a medium mixing bowl and stir in the flours with a wooden spoon until a stiff dough forms. Scrape down any dough from the sides of the bowl. The dough will not be smooth. Cover the bowl with plastic wrap and let it sit for 24 hours.

If this goes according to plan, it will be the beginning of a journey through the bread-making techniques of the old world. If this fails, I may have to start making my grill cheeses on Wonderbread. Stay tuned.

Read Full Post »

Saturday (day 2)

we emerged from our tents and scoped out a perfect spot on the field to plant ourselves for brunch and beyond.

Tempeh Bacon and Avocado Sandwiches

with Corn Salad

The corn salad was inspired by Mexican street corn (grilled with mayo, chili powder, lime and cotija cheese.) I made it at home with Trader Joe’s frozen corn, lime, olive oil, ancho chili powder, scallions and feta cheese. The sandwiches were served open faced on whole wheat bread. Dessert was delicious, juicy cherries.

Dinner was kebabs.

Curried Beef and Veg Kebabs with

Corn on the Cob and Grilled Bread

We used red onion, zucchini, yellow squash, red pepper, and beef….All drizzled with olive oil and sprinkled with salt, curry powder and some cumin (although there is cumin in the curry powder–see below–I LOVE cumin on grilled food.)

The curry powder was made from scratch from Mark Bittman’s “Hot Curry Powder” recipe:

  • 2 small dried Thai or other hot chili (I used dried ancho)
  • 1 T black peppercorns
  • 1 T coriander seeds
  • 1 t cumin seeds
  • 1 t fennel seeds
  • 1 t fenugreek seeds
  • 1 T ground tumeric
  • 1 t ground ginger

All the spices were toasted in a skillet until fragrant and then ground in a spice mill (actually a coffee grinder re-purposed for grinding spices).

Served with the kebabs, we had hummus (bought from Stew Leonard’s) and grilled bread (simply brushed with olive oil and grilled). One trick to great toasted or grilled bread is to not let it lie flat while its still hot. This will ensure it stays crispy on both sides. Check my fancy technique above, borrowed from my card-house building days.

Day 3

Sunday, was brunch—we ate all that was leftover, and it was delicious.

Tomato and Avocado Salad

Watermelon

We also ate apples and peanut butter, stuffed grape leaves, a grapefruit, and cherries…

We left the Mountain Sunday afternoon, and made a couple of food-stops on our way home. First at the 209 Diner for a late lunch, followed by a classic 4th of July dessert — ice cream at D’Lite’s.

Read Full Post »

Cold brewed iced coffee is where it’s at (like we said, see previous post)…And it’s how we started our first day in the wilderness.

Breakfast in the woods is easy, when you have the right equipment and pantry. As we drank our coffees, we prepared an easy, classic breakfast.

Nova and Tomato and Cream Cheese Open-Faced Sandwich

It was a sandwich kinda day, and for lunch we made…

The Ultimate Grilled Cheese

We layered 3 slices of aged cheddar cheese with sun dried tomato spread and arugula, butter on both sides of the whole wheat sandwich bread and grilled (on the actual grill) til gooey. Let me just say, YUM!

It should be noted here that it was for this meal that the men decided to eat their spicy Italian sausage. It was grilled and served on garlic bread.

The sandwich was also served with some salmon salad which I made at home and brought with us. (I roasted some defrosted Trader Joe’s salmon with olive oil, salt/pepper and crumbled it over salad greens. We dressed the salad a la minute with balsamic and olive oil). A cold beer pairs nicely.

Read Full Post »

I have a lack of culture, its clear to me now.

If you haven’t read about my culture, I’m trying to capture and develop yeast to create my own sourdough starter, read how I did it here.

I don’t know what went wrong, but I have not yet seen the tell-tale signs that I’m supposed to be looking for to tell me my culture has developed… which are:

  • The surface will be glossy and dotted with air bubbles, like a pancake ready to be flipped (I may have seen this)
  • The culture will have risen anywhere from 1/3 to 1/2 (never saw this)
  • It will smell like very ripe apples with undertones of wheat (nope)
  • It will taste tart and fruity (possibly)
  • When you draw a rubber spatula through it and lift it up, long elastic strands will hang from the spatula (definitely didn’t see this)

He ( Daniel Leader) also talks about how if you don’t stir it for a while there can be puddles of grayish water on the surface… which is alcohol and water, normal byproducts of the fermentation which are referred to as hooch. I saw a clear separation of liquids when I didn’t stir it, but the liquid was more yellow and clear (see below)… being that I only had maybe one sign above, I don’t think I had a healthy culture.

So I started again… and the same thing happened…
Tomorrow I am going to attempt to create a culture in a stiff dough levain… the starter needed to make the “Quintessential French Sourdough”. I will not give up.

Read Full Post »

This is hands down the easiest and best bread to make. And when I say hands down, I mean it… there is NO KNEADING INVOLVED. You won’t believe that you actually made it yourself, it tastes like it came from a fancy french bakery… and it really couldn’t be any easier. You just need some time. This recipe came from Jim Lahey of Sullivan bakery by way of Mark Bittman by way of the New York Times. Its a real gem.

Ingredients:

  • 3 Cups Bread Flour
  • 1/4 tsp instant yeast
  • 1 1/4 tsp salt
  • 1 1/2 Cups Water

Method:

In a large bowl, mix together the flour, yeast and salt until well combined. Add the water and mix with your hand just for a few seconds until all the flour is incorporated. The mixture will be quite sticky and shaggy. That’s normal.

Cover the dough loosely with plastic wrap and leave it for 15-20 hours. When ready it will be dotted with air bubbles and will have risen considerably.

Dump the dough out onto a well floured surface and fold it on itself a couple of times.

Let it rest for 10 minutes. Next, flour your hands and the dough (with just enough flour to allow you to handle the dough) and shape it into a ball. The dough will be very sticky and not so easy to handle. Don’t worry if its not pretty, it’ll all work out, trust me.

Now place the dough on a kitchen towel that’s dusted with yellow cornmeal, dust the top of the dough with more yellow cornmeal, and cover with another kitchen towel.

Let it rise for 2 hours, or until it doubles in size. It’s done when a pressed finger depression doesn’t quickly bounce back.

1/2 hour before the dough is ready, preheat an oven to 500 degrees, and place a Cast Iron pot with a lid into the oven.

After the oven has preheated, slide your hands under the kitchen towel and toss the dough in, seem side up (again don’t worry if its not pretty), and bake for 30 minutes with the lid on.

Take the lid off and bake another 15-30 minutes or until there’s a nice golden crust.

Turn out onto a cooling rack, and ta dah!

Easy huh?

Read Full Post »

Older Posts »